
What to decide first
A new front walk comes down to three choices: what it is made of, what shape it takes, and what grows and glows along it. Size comes before all three. Landscaping Network puts the minimum at 4 feet wide and prefers 5, so two people can walk side by side.
Look at the house before you pick anything. Homes & Gardens suggests using a material the exterior already has, such as the same brick or stone, so the path looks as if it was always there.
Front walkway ideas by material
- 1. Poured concrete: Plain and solid. It can be stained, stamped or given a border; Landscaping Network pairs a concrete walk with a brick border on a house with brick accents.
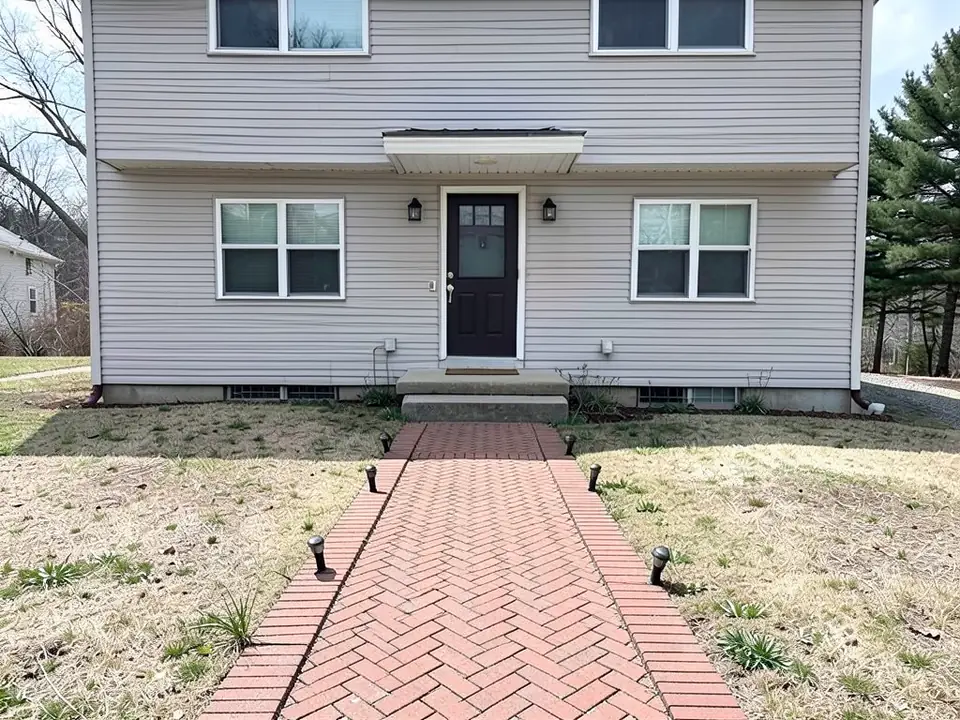
- 2. Brick: Classic on older homes. DIY Garden lays it in herringbone and says to edge it for a crisp finish.
- 3. Flagstone or bluestone: Natural slabs with an informal look. Landscape designer Kate Anne Gross lists bluestone, limestone and flagstone among her top path materials (Homes & Gardens).
- 4. Concrete pavers: Many shapes and colors. For a modern house, Homes & Gardens shows rectangular pavers set in gravel.
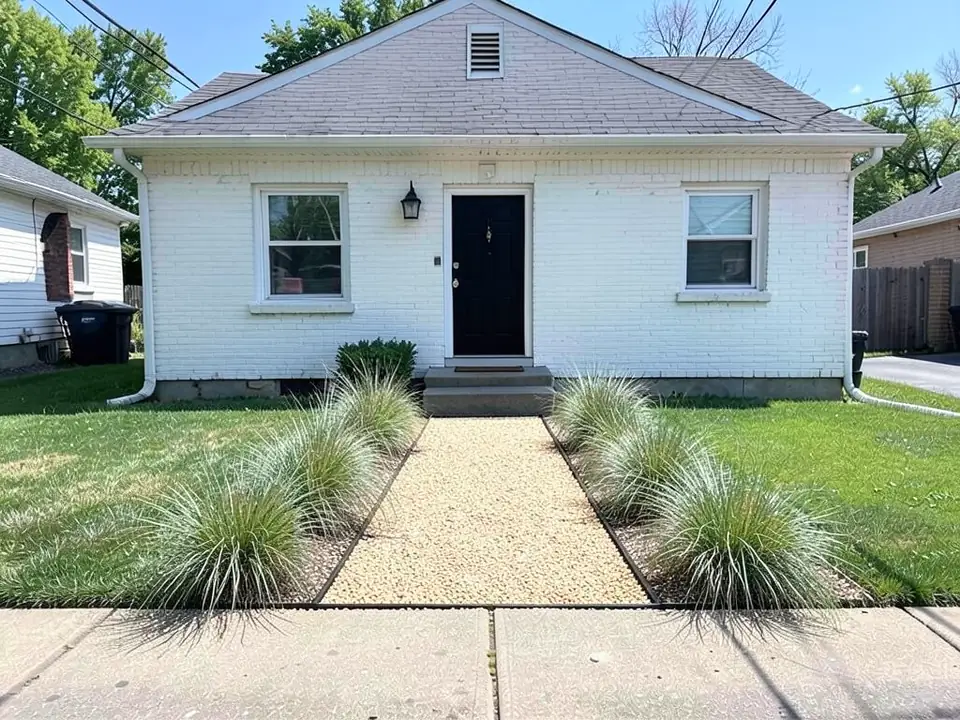
- 5. Gravel: The low-budget option. DIY Garden and Homes & Gardens both say to add steel or other edging so the gravel stays off the lawn. For a main entry, crushed gravel or decomposed granite packed firm is steadier than round pea gravel, which rolls underfoot.
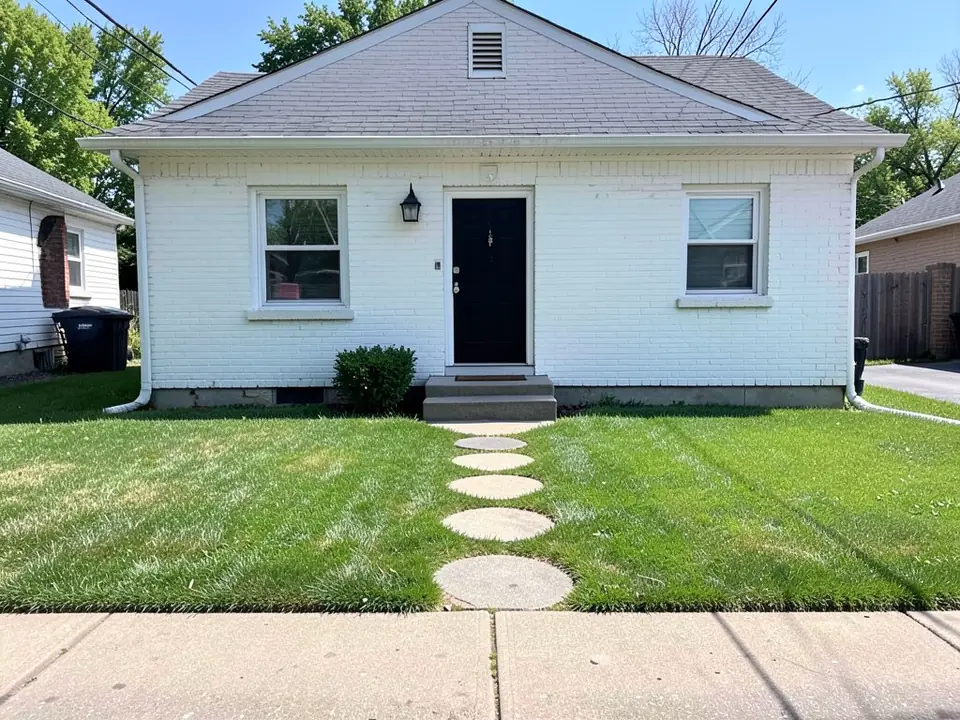
- 6. Stepping stones: Relaxed, with thyme, moss or gravel between them (DIY Garden). Landscaping Network notes that a solid surface is safer underfoot than loose gravel or separate stones, so stepping stones suit a side path better than the main entry.
Straight or curved?
Landscaping Network suggests a simple straight walk for a small front yard and a formal house such as a Colonial or Victorian, since it leads the eye to the door. A curve suits a bigger yard and an informal house such as a ranch.
Keep curves gentle. If the path wanders too far from the direct line, people cut across the lawn instead (Landscaping Network). A long straight walk can still be softened with plants that spill over its edges.
Landscaping along a front walkway
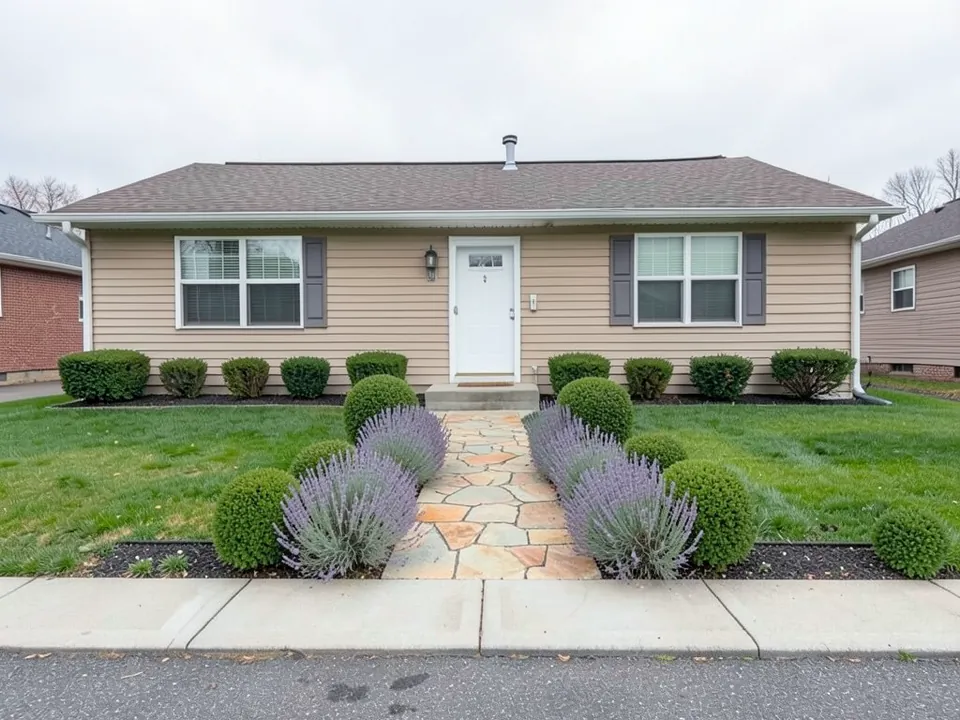
- 7. A matched pair of borders: The same low plants on both sides, such as lavender and boxwood, give a tidy, formal frame (our first example).
- 8. Plants that soften the edge: Low perennials or groundcovers that spill a little over the edge hide a hard line; DIY Garden recommends planting that blurs the edge and leads people along.
- 9. Leave room to grow: Set shrubs back from the edge by about half their mature width, or they will crowd the walk in a few years. The plant tag gives the mature size.
- 10. Edging: Steel, brick or stone edging keeps mulch and gravel on their own side and makes the line look finished.
- 11. Planters: Large pots or built-in planters beside the walk bring color up to eye level and can change with the seasons (DIY Garden).
- 12. A dry-climate path: Gravel or decomposed granite with lavender, agave and grasses needs little water (DIY Garden). See our xeriscape front yard guide below.
Walkway lighting ideas
- 13. Solar stake lights: The easiest start, with no wiring. DIY Garden says even a few solar lights make a difference.
- 14. Low-voltage path lights: Wired fixtures on a transformer give steadier light than solar; plan the cable run before the walk is laid.
- 15. Lights in the steps: Homes & Gardens shows small lights built into the stair risers, so the steps are easy to see at night.
- 16. Space them out: Pools of light that lead to the door look calmer than a tight runway of fixtures, and low, shielded lights avoid glare in the eyes.
Front walkway ideas on a budget
- Keep the walk, change the edges: If the concrete is sound, a border of brick, stone or plants can change the look for much less than a new walk.
- Gravel with steel edging: Among the cheapest new paths, as long as the edging is solid.
- Stepping stones in mulch or gravel: Fewer materials to buy, though less comfortable for the main entry.
- Do one part at a time: Lay the walk first, then add plants and lights as the budget allows. A render helps you plan the finished look up front.
Before you dig
- Call 811 (US): Have buried utility lines marked before you dig a path base, set edging or bury light cable.
- Water: A walk should shed rain to the lawn or beds, never toward the house.
- Steps and levels: Any step or change in height needs to be even and well lit. Check with your local building department about code for steps and railings.
- HOA and permits: Some neighborhoods have rules for front yards and materials. Check before you order stone.
How to try a new front walkway on your own photo
Use Custom mode for this. The Yard Redesign styles tell the AI to keep the driveway and sidewalk exactly the same, so they are made for changing plants and beds, not for replacing a walk.
- Photograph the walk in daylight from the street or the end of the walk, with the phone level and the whole walk, the steps and the front of the house in frame. JPG or PNG works.
- Open the landscape tool and sign in with Google or an email code. You get 1 free render with a free account.
- Under Select Landscape Mode, pick Custom.
- In the Custom Design Requirements box, describe the new walk: material, pattern, shape, edging, plants on each side and any lights. Then say what must stay the same, such as the house, steps, driveway and street sidewalk.
- Upload your photo under Upload Your Garden Image and click Generate Custom Design.
- Compare the result with your photo, change one thing at a time and run it again.
What the AI can and cannot do
The AI shows a look: how a material, a shape or a planted border would sit in front of your house, which helps you choose and explain what you want to a contractor.
It is not a plan or a quote. It does not measure width or slope, and it does not always follow the instruction: above, it kept a path straight when we asked for a curve and drew lights without solar panels. It usually keeps the house as it is, but it also changed things nobody asked for, such as a slab at the foot of the steps and new mulch beds. Check the result against your photo.
Walkway instructions to paste into Custom mode
These are the exact instructions we used for the three examples above, in the same order. In the landscape tool, choose Custom, paste one into the Custom Design Requirements box, then upload your photo. Swap in your own material, plants and what must stay.
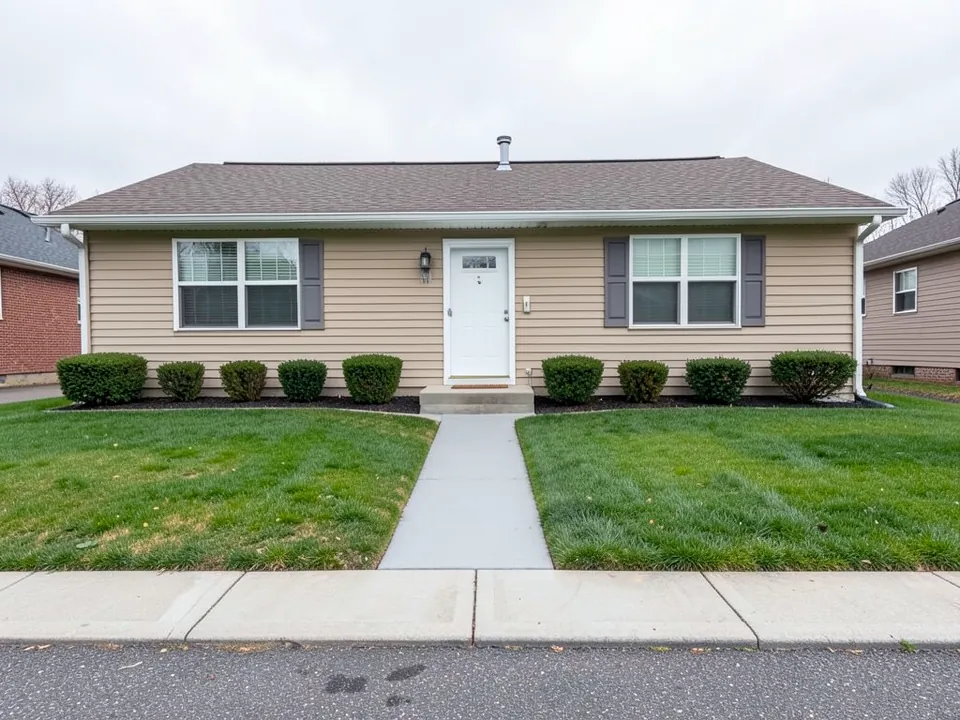
- Replace the straight concrete walkway with a gently curving natural flagstone path from the street sidewalk to the front step, with low borders of lavender and small round boxwood shrubs along both sides of the path. Keep the house, windows, front door, front step, the shrubs along the house, the street sidewalk, sky and camera angle exactly the same.
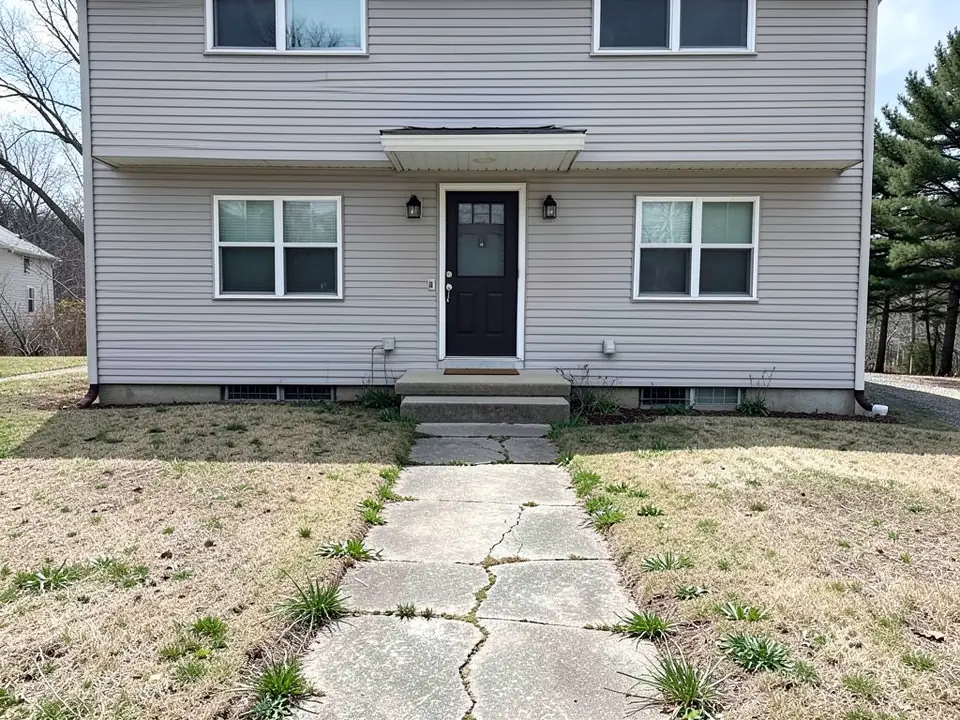
- Replace the cracked concrete walkway with a wider red brick paver walkway in a herringbone pattern, edged on both sides with a row of bricks set on end, and add small black solar path lights along both edges. Keep the house, windows, front door, concrete steps, the lawn, trees, sky and camera angle exactly the same.
- Replace the stepping stones with a straight path of light tan pea gravel about three feet wide, edged with thin black steel edging, and plant clumps of ornamental grasses along both sides of the path. The gravel path stops at the concrete public sidewalk along the bottom of the photo. Keep the house, windows, front door, steps, the rest of the lawn, the concrete public sidewalk, sky and camera angle exactly the same.
Frequently asked questions
What is the best material for a front walkway?
It depends on the house. Solid surfaces such as concrete, pavers, brick and flagstone are steadier underfoot than gravel or stepping stones (Landscaping Network), and a material the house already has tends to look right (Homes & Gardens).
How wide should a front walkway be?
Landscaping Network says at least 4 feet, with 5 feet preferred, so two people can walk side by side.
How do I landscape along a front walkway?
Use low plants near the edge, repeat one or two of them along both sides, set shrubs back so they do not crowd the walk as they grow, and add edging to keep mulch and gravel in place.
What are cheap front walkway ideas?
Keep a sound concrete walk and change its edges with brick or plants, lay gravel with solid steel edging, or set stepping stones in mulch or gravel for a secondary path.
Should a front walkway be straight or curved?
Straight suits small yards and formal houses; a gentle curve suits larger yards and informal houses. Too many curves and people cut across the lawn (Landscaping Network).
What lighting works for a front walkway?
Solar stake lights are the easiest start, low-voltage wired lights are steadier, and lights built into the steps make them easy to see at night. Space fixtures out and keep them low to avoid glare.
Will the AI change my house, steps or driveway?
In Custom mode, your instruction is what steers it, so name what must stay the same. It usually keeps the house, but not always everything: in two of our examples it paved over a slab at the foot of the steps, and it added mulch beds nobody asked for.
Do I need an account, and is it free?
You need an account, and it is free: 1 free render with a free account, and free renders carry a watermark. More renders and no watermark come with a paid plan.